
Short Description
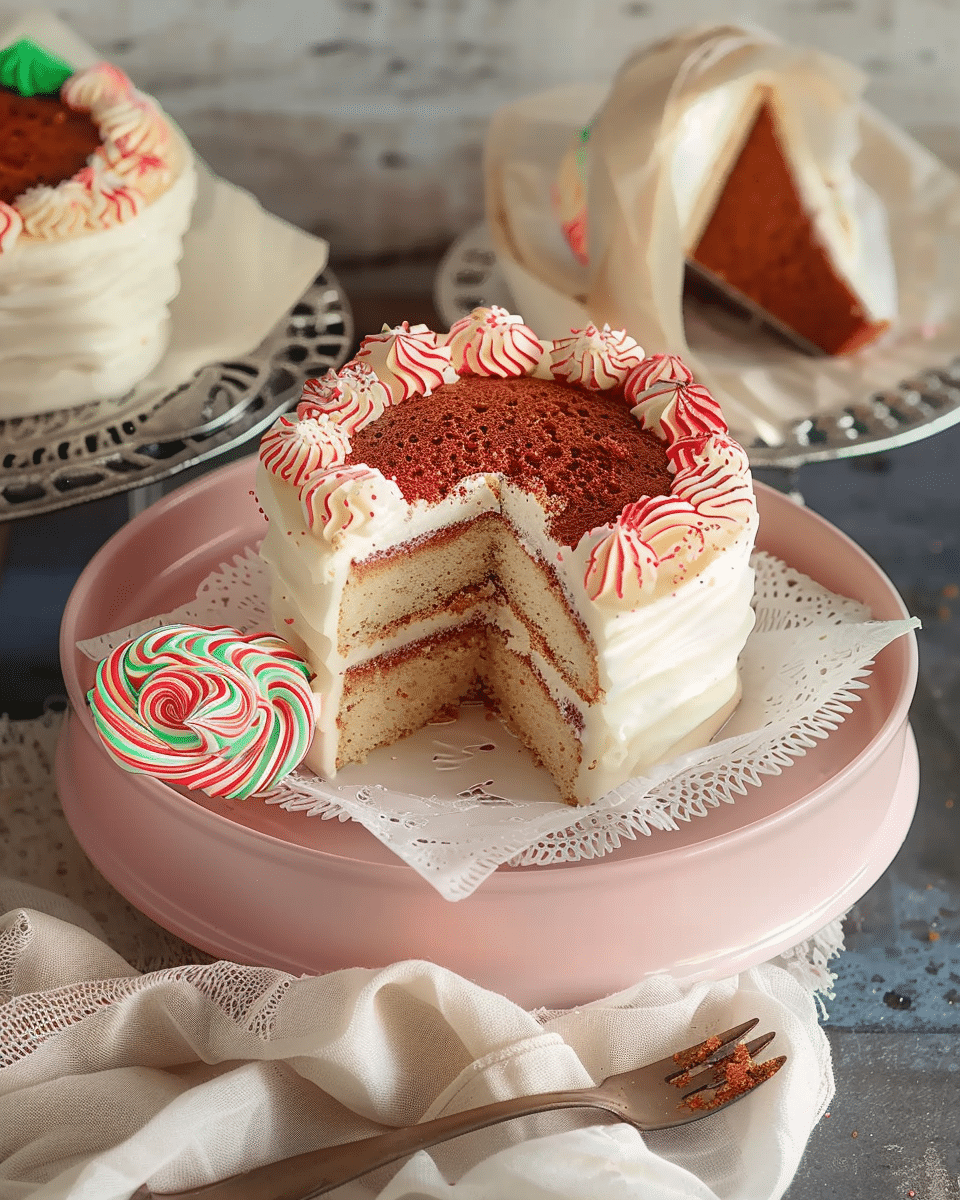
Mini layered cakes baked in a flat pan, cut into individual-sized rounds, and frosted to perfection—ideal for gifting, picnics, or an adorable dessert presentation.
Why You’ll Love This Recipe
These Korean-style lunchbox cakes are charming, custom-sized miniature treats that fit neatly in bento-style boxes. You can personalize the layers and frosting, and the single-serve format means no cutting or mess—just delightful, portable sweetness!

Ingredients
(Tip: You’ll find the full list of ingredients and measurements in the recipe card below.)
- 1 box prepared cake mix of choice, or your favorite cake recipe prepared but unbaked
- Approximately 4 cups prepared buttercream frosting, plus extra for decorating
Directions
Bake Cake
- Prepare Batter
Mix cake mix or recipe ingredients as directed. - Prep Pan
Grease a large, flat pan (e.g., 10×15″, 12×17″, or 9×13″ jelly-roll pan). Line the bottom with parchment paper, then re-grease. - Bake
Pour batter into the pan and bake according to instructions. For jelly-roll pans, check at 8–10 minutes; typical bake time is around 10 minutes. Cake is done when a toothpick comes out clean. - Cool Completely
Allow the cake to cool fully before proceeding.
Cut Cake Layers
- Choose Shape and Size
Using a 4″ cookie cutter (or stencil and knife), cut out rounds that will fit in your to-go boxes. If moist, lightly dust the cutter with powdered sugar or flour to prevent sticking. - Decide Layers
Depending on thickness, stack two or three cake rounds per mini cake.
Assemble Cake
- Prepare Container Base
Cut a piece of parchment or wax paper to fit the bottom of each cake box or container. If using a turntable, place a non-slip pad underneath the parchment to stabilize. - First Layer
Place a small dab of frosting on the parchment to anchor the first cake round in place. - Layer on Frosting
Spread a layer of buttercream evenly atop the first round. - Add Layers
Repeat with a second (and optional third) cake round, applying frosting between each. - Crumb Coat
Apply a thin layer of frosting over the sides and top to seal in crumbs. Chill for 20–30 minutes until the frosting firms.
Final Frosting
- Frost Smoothly
Apply a thicker layer of buttercream all around, smoothing the sides and top with a bench scraper, offset spatula, or plain knife.
Decorating and Serving
- Decorate
Add decorations—piped frosting, sprinkles, chocolate drip, fruit, or candy. - Package
Place the finished mini cake (still on parchment) into its to-go container. Chill briefly beforehand if desired to firm up. - Complete the Presentation
Optionally include a fork, secured with decorative tape or ribbon, and the cake is ready to serve, gift, or enjoy on the go!
Servings And Timing
- Makes: Multiple 4″ mini cakes, depending on pan size and layer thickness
- Prep Time: ~10 minutes for batter
- Bake Time: 8–12 minutes
- Assembly & Frosting: ~20–30 minutes (plus chilling steps)
- Total Time: ~45–60 minutes (plus optional chilling between steps)
Variations
- Flavor Options: Bake in chocolate, red velvet, or citrus cake batter as desired.
- Filling Flair: Spread jam, lemon curd, or ganache between layers before frosting.
- Frosting Swap: Use cream cheese frosting, whipped cream, or ganache in place of buttercream.
- Decor Ideas: Top with fresh fruit, edible flowers, sprinkles, or candy.
- Shape Play: Use square cutters or mini tart pans instead of rounds.
Storage/Reheating
- Room Temperature: Store in a cool spot for up to 2 days.
- Refrigeration: Store in the fridge for up to 4 days; allow to come to room temperature before eating.
- Freezing: Freeze unfrosted layers for up to 1 month; thaw before assembling and decorating.
FAQs
1. Can I make these without a cookie cutter?
Yes—trace a cup or stencil and carefully cut with a knife.
2. How many layers should I use?
Use two layers for a flatter cake or three for a taller dessert—just ensure it fits in your box.
3. Why crumb coat?
A thin coat seals in crumbs, creating a smooth finish for the final frosting layer.
4. Can I fill the layers with jam?
Absolutely—add a thin layer of jam or curd between cake layers before frosting.
5. How do I keep the cakes from shifting?
A dab of frosting under the bottom layer helps anchor the cake in place.
6. Can I use other frostings?
Yes—cream cheese, whipped, or chocolate ganache work well, though texture may vary.
7. Do I need to chill between steps?
Yes—the chill after the crumb coat helps firm the frosting and makes the final coat smoother.
8. Can I decorate ahead?
Yes—decorate, chill, and seal the boxes; they’re perfect for gifting or transport.
9. Will the cake get soggy in the box?
No—as long as the frosting seals in moisture and the container closes properly.
10. What frosting consistency is best?
Use slightly thick (not runny) buttercream for easy layering and clean smoothing.
Conclusion
Korean Lunchbox Cakes are charming, portable, and endlessly customizable. Easy to bake, layer, and decorate, they’re ideal for special occasions—or just because! Create mini desserts that are as cute as they are delicious, perfect for sharing or gifting.
Print
Korean Lunchbox Cakes
- Total Time: 45–60 minutes
- Yield: 4–6 mini cakes depending on pan and cutter size
- Diet: Vegetarian
Description
Mini layered cakes baked in a flat pan, cut into individual-sized rounds, and frosted to perfection—ideal for gifting, picnics, or an adorable dessert presentation.
Ingredients
1 box prepared cake mix of choice, or your favorite cake recipe prepared but unbaked
Approximately 4 cups prepared buttercream frosting, plus extra for decorating
Instructions
- Prepare cake batter as directed by your recipe or box mix.
- Grease and line a large flat pan (10×15″, 12×17″, or 9×13″) with parchment paper.
- Pour batter evenly and bake at recommended temperature, checking for doneness around 8–12 minutes.
- Cool the cake completely before cutting.
- Use a 4″ cutter to cut out rounds. Lightly dust cutter if needed.
- Stack two or three rounds with frosting between each layer on a parchment base in your container.
- Apply a crumb coat and chill for 20–30 minutes.
- Frost with a final smooth buttercream layer using a spatula or scraper.
- Decorate with piped frosting, sprinkles, or fruit.
- Place cake into a lunchbox or to-go container. Optionally include a fork or decoration.
Notes
- Use chocolate, red velvet, or citrus cake bases for variety.
- Add jam or curd between layers for flavor contrast.
- Try cream cheese, whipped cream, or ganache as frosting alternatives.
- Top with fruit, flowers, or themed decorations.
- Store assembled cakes chilled for transport or gifting.
- Prep Time: 10 minutes
- Cook Time: 10 minutes
- Category: Dessert
- Method: Baking
- Cuisine: Korean
Nutrition
- Serving Size: 1 mini cake
- Calories: 460
- Sugar: 38g
- Sodium: 320mg
- Fat: 24g
- Saturated Fat: 10g
- Unsaturated Fat: 13g
- Trans Fat: 0g
- Carbohydrates: 58g
- Fiber: 1g
- Protein: 3g
- Cholesterol: 45mg


